How to Tile an Outdoor Table at Home – Practical Tips and Recommendations
It’s almost time to greet the warm season! To me, a fine way to prep your home for summer is updating the look of your outdoor furniture. Doing so will bring all the right energies you need to spend a lovely time outside.
Old outdoor furniture can become a real piece of art if you decide to give it a new look. My mission today is to tile a tabletop of your pation table to make it look fresh and stylish.
So, if you’re a DIY lover like me, get ready for this fun task! Join me on this journey and learn how to make a tile tabletop for the outdoors. And don’t worry about your budget either. You will need just a few simple tools to make it look amazing.
Table of Content
Tiled Tabletop Design Ideas
I’m aware that we all have different tastes, which is why I’ll be sharing various types of replacement tiles for the patio table.
Each design is special in its own way, but no matter which one you choose, I am sure that the final result will be stunning. I guarantee that you’ll be getting compliments on your DIY outdoor tile table.
So, without further ado, let me introduce you to the most common outdoor models.
1) Porcelain tile outdoor table
Aside from looking elegant, porcelain is a great choice for table tiles. First, it’s capable of supporting heavy loads – you can place anything on the porcelain tiles with peace of mind. Secondly, they’re resistant to stains, which means you won’t have to clean your patio table as often. Besides, porcelain can resist abrasions and chemicals too.
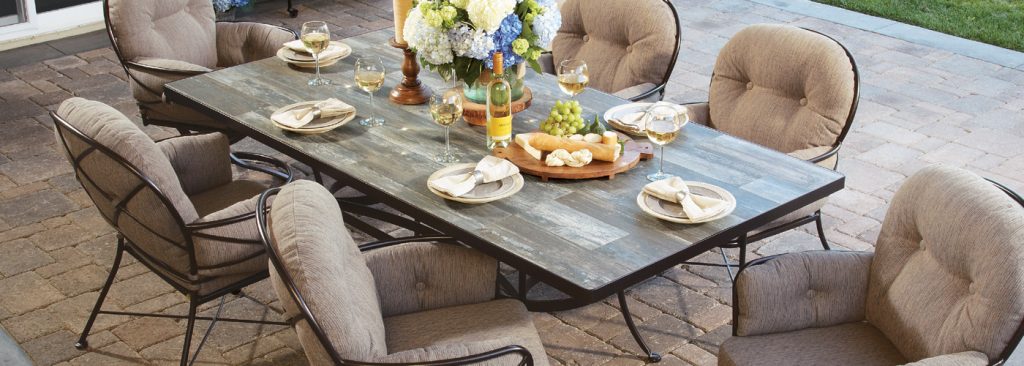
Take a look at the picture above and check out how powerful this porcelain table looks in combination with soft and comfortable chairs.
2) Spanish tile table
In Spanish, this tile is known as “Majolica.” These artistic tiles date back thousands of years. They were invented in Southern and Eastern Spain. The image below shows a common design for such tabletop models:
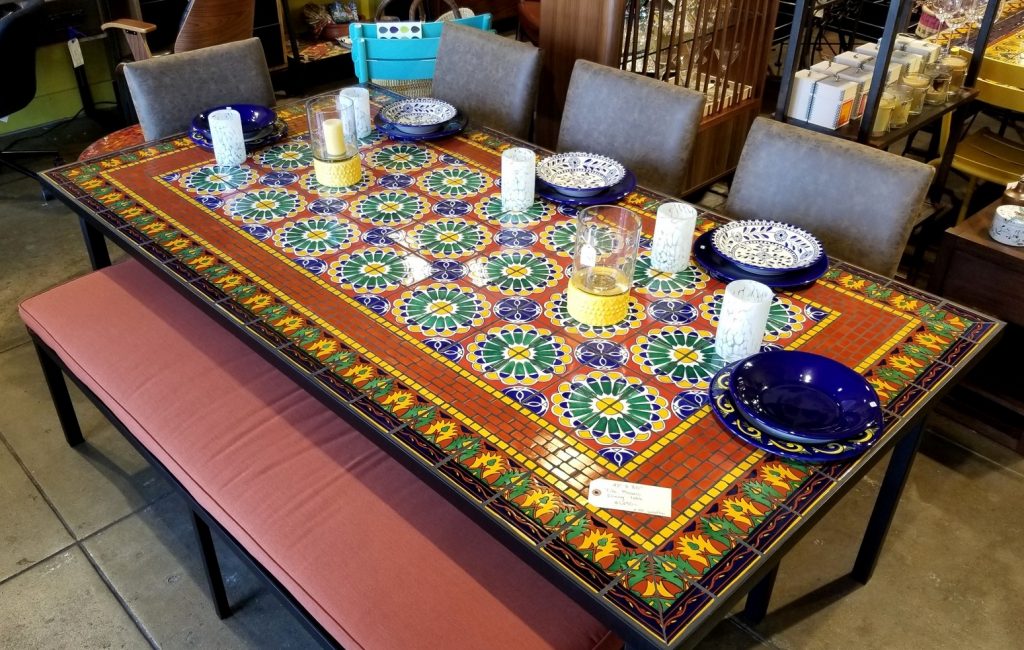
Time was passing, and this wonderful Spanish tile shifted from a primary art form to a dual purpose with functional qualities. Durable Spanish terracotta and encaustic tiles will not only provide an artistic and colorful addition to your table but also ensure longevity and resistance.
Lots of colors and unique details will give a special charm to any home design. Don’t be afraid of getting out of your comfort zone and add vividness to your backyard or terrace!
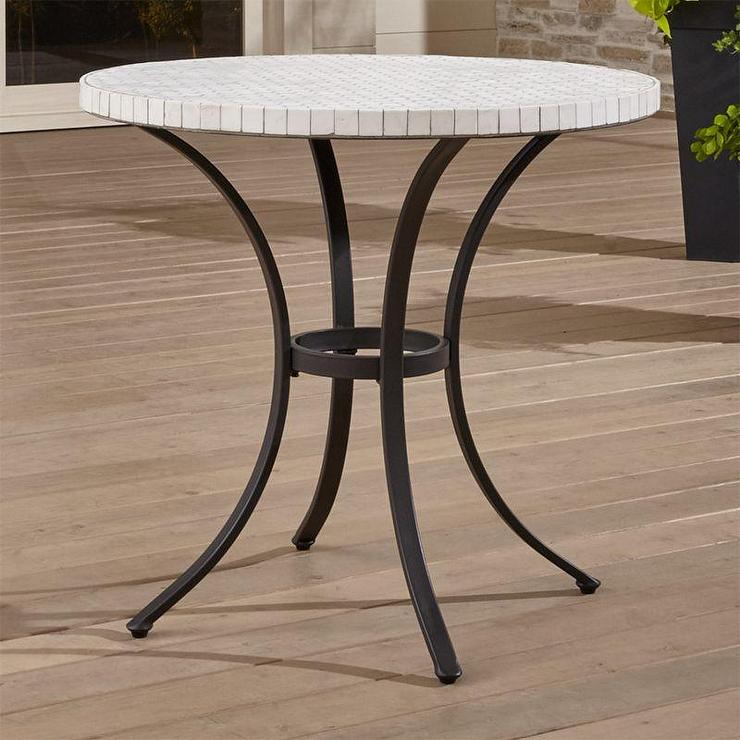
3) Round tile table
Drum tables are heavy and were invented in the late 18th century. You can use place it in a convenient spot near a lounge chair, like in the example below, and use it while chilling with a glass of wine or a book:
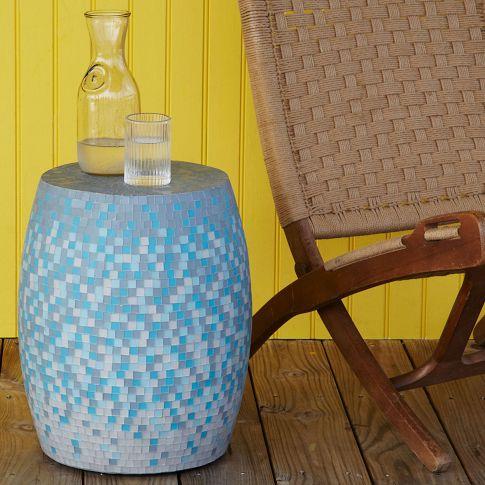
I really like this little drum side table in the picture above. Tiny blue tiles are reminiscent of a swimming pool and thus add a dose of exoticism to your yard.
Ottoman tables are another outstanding option as they redefine multi-purpose usage. It’s said that this furniture emerged after everyone’s reflex to plop feet on tables in front. Funny, but it’s true!
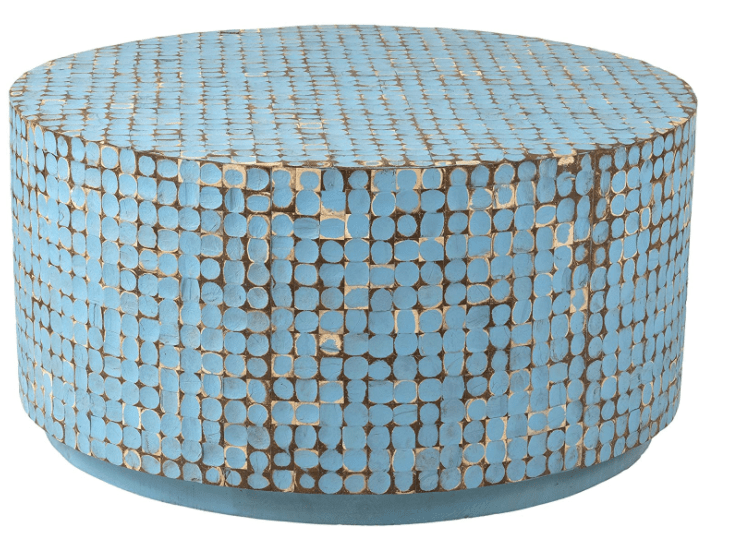
These tables are very durable so you can put heavy objects on them without fear of getting them destroyed.
4) Metal tile coffee table
Metal coffee tables literally elevate the look of whichever area they’re placed in. The material is much stronger than others employed in manufacturing coffee tables.
However, the metal table can rust. Most of the time, this happens because of the painting process initially done on the product. Corrosion is also a sign that the topcoat is not of high quality. Quality patio furniture should hold up for many years without these issues.
If you’re interested in seeing more tables offered in metal construction, check out the one below:

The square coffee table in the image above is my personal favorite. Just look at these beautiful metal legs in an unusual shape, making the table even more special. And think about the practicality, too: this coffee table will be very durable and heat resistant, so you don’t have to worry if you drop a hot cup of coffee or tea on it.
If you are a fan of round tables, you might like this example:
This cute round table will go great with some vintage chairs. I suggest you put your favorite flower in the middle to make it look complete.
5) Mosaic tile table
Mosaic tile is composed of many tiny pieces of varying shapes and styles. The term mosaic itself means a piece consisting of little elements. It can be constructed with different materials, like metal, ceramic, mirror, glass, porcelain, and natural stone.
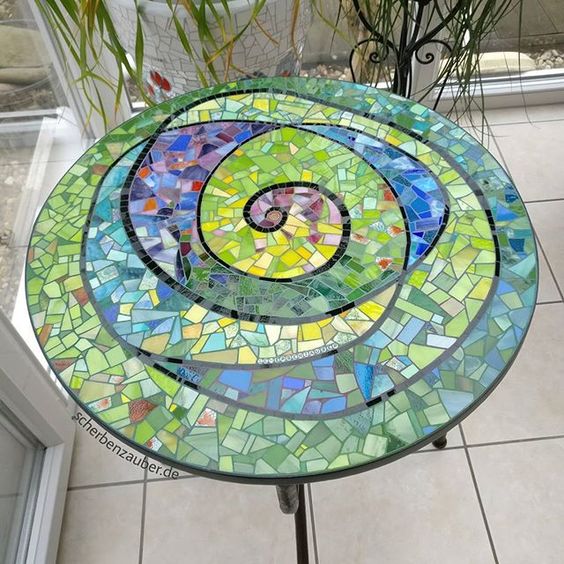
You must have seen tables like the one in the picture above installed in bathrooms the most. However, outdoors it will look superior – imagine how different colors of the mosaic will play in the sun?
Mosaic tiles are sold in a sheet for quick installation. Even mosaic crockery is a hit in the market. One can be truly lost in the variety. You can even pick 4 to 5 mosaic pieces and integrate them together to form the mosaic patio table. Just let your imagination run wild!
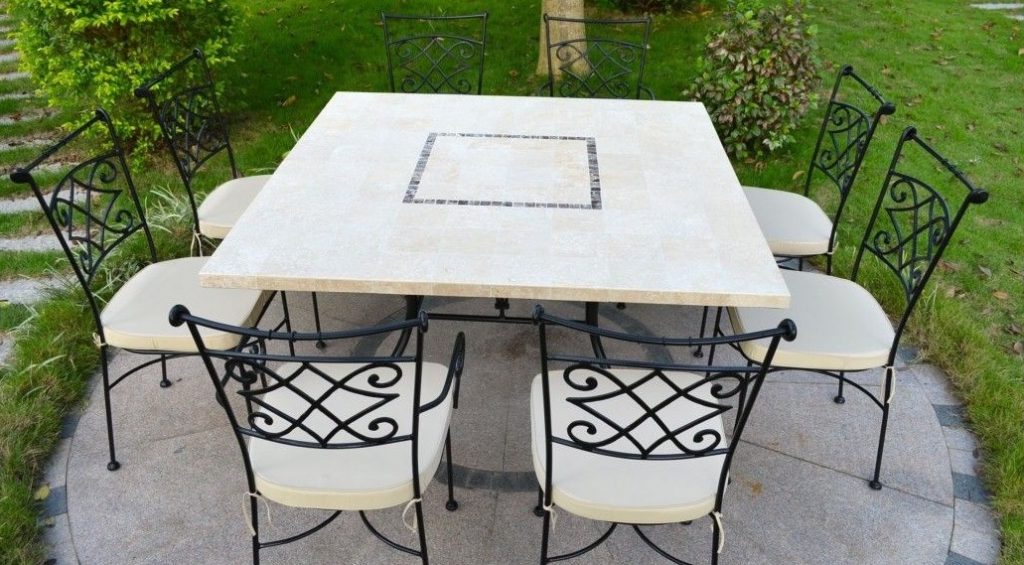
6) Marble tile outdoor dining table
Marble can be defined in three words: aesthetic, timeless, and resilient. These attributes make it ideal to be utilized for an outdoor dining table.
I have one on my patio and have been using it for years. It supports the weight of everything. I’ve had brunches on it numerous times and it still looks like new.
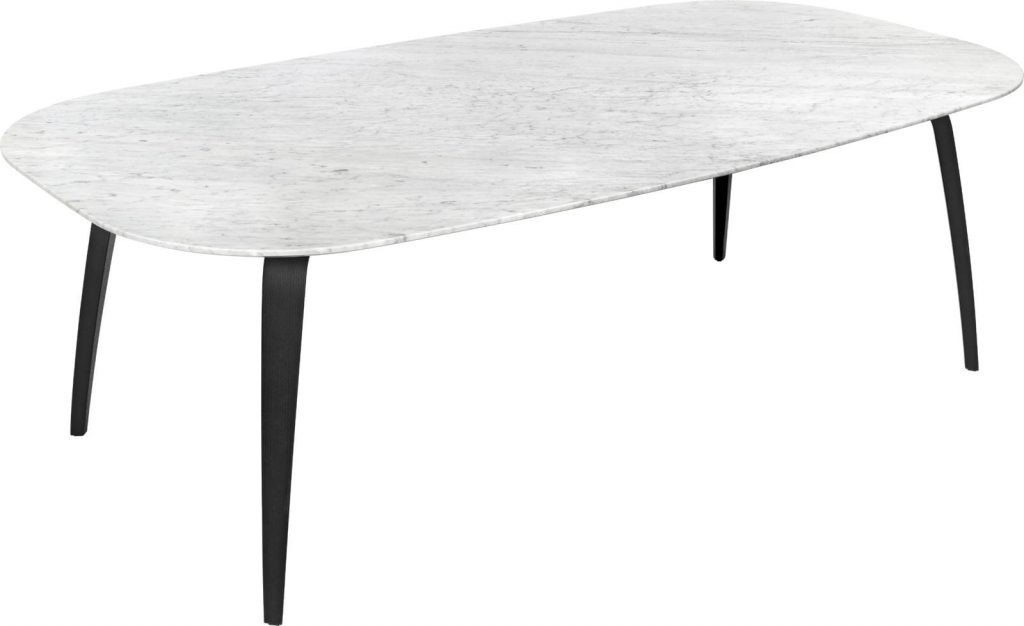
Below, I decided to highlight two versions of marble tile outdoor dining tables – in Scandinavian and farmhouse style.
The Scandinavian aesthetic is fueled by minimalism and clean lines. Neutral and wooden colors are the most common in this concept. Scandinavian marble tile tables are highly practical – you won’t have to worry about their durability. Besides, they are sophisticated and slim. Take a look at the piece below:
In its turn, the farmhouse concept is characterized by elegance and heavy materials. One can observe detail-oriented aspects of craftsmanship, such as complex molding and transoms. Farmhouse tables resemble decoration pieces. Combination of wood and tile looks perfect. Check this out:
Unlike trends that change from season to season, tables like this are always the perfect choice when you decide to decorate your backyard.
DIY Table Tiling Materials
Now that we have gained sufficient inspiration for the tabletops, let’s go over the procedure of making a tile top patio table. I’ll list down all the equipment and tools required so that you can do the necessary prep. You will need brushes, tiles, paint, tile grout, tile adhesive, sealant, tile spacers, and MDF.
All these terms sound unfamiliar and frightening to you? Don’t worry, they seemed like that to me as well. But they are only scary in theory. In practice, I quickly mastered the technique, and I know that you will rock it, too!
Are you ready to remodel your forgotten table? Let’s start!
Tiles
I’ll go through different types of tiles first to help you make the right choice.
Ceramic tiles are popular in most homes. The ceramic tile outdoor table is common in furniture too and looks charming.
So, ceramics can be used anywhere. It is also budget-friendly, long-lasting, versatile and can be maintained easily. The negative side of it is that ceramic is hard, difficult to install, and cold.
Porcelain is another excellent choice because porcelain tiles are sturdy and come in many designs, so you’ll have a wide variety to choose from. The only con of it is that it’s a little bit tricky to install.
For those of you who prioritize aesthetics over practicality, glass works best as a tabletop. There are tons of varieties that are available so everybody can find something for themselves. = However, you should keep in mind that glass tiles are expensive and demand too much effort to install. Besides, the durability is quite questionable.
In its turn, marble offers elegance and sophistication wherever it’s placed. But as much as marble looks pristine, it easily loses its charm if high maintenance is not given. Indeed, it is alluring, high-density, lustrous, unique, and eco-friendly. On the other hand, it is expensive, soft and prone to scratching.
To find the tile of your dreams, consider the grout color, texture, patterns, and how the particular tile looks under natural light. Lastly, I highly recommend waterproof outdoor tiles.
Paint and brushes
For extra creativity, you can make the tiles your canvas and apply whatever color you wish on it. This is particularly true for individuals who tile a wood top table, as wood is great for painting. O course, this task is time-consuming and requires some effort, so make sure that you have high-quality brushes and paints at hand.
Naturally, the quality of paint and brushes gets better as you climb higher on the price spectrum, but don’t be stingy. It will be the worth it.
Tips On Choosing High-quality Paints and Brushes
- Get the suitable shape and size of the brush according to the project. The shape of the brush head and the texture of the bristles should allow you to make the strokes easily.
- As for choosing paints, opt for the colors that go hand-in-hand with the overall furniture theme.
- Try to experiment with painting on some spare parts of extra tile to see how different shades look.
Don’t forget one thing: if you have the right tools, every job will be much easier. It might take you some time before you figure out what works for you.
Tile grout
To build a tiled tabletop, tile grout is the make-or-break component of the whole project. This element will be responsible for holding the tile intact.
Considering how important tile grout is, it’s essential to know how to pick the one of premium quality and, of course, the right color.
When it comes to grout colors, the below pointers are helpful:
- If a modern and bold look is your primary goal, go for a high contrast between tiles and the color of grout.
- In case you want your tabletop to look classic and simple, the contrast should be minimal.
- If you want to play on a safe side, opt for colors that complement each other.
If you still can’t decide between the available choices, blindly choose the white grout, as it’ll go with everything.
Tile adhesive
Tile adhesive is an economical solution for affixing tiles on any surface in a jiffy. Since it comes in ready-made mixtures, the application procedure is user-friendly. In the end, you’ll have smooth, stain-resistant, and durable tiles.
For those of you who have never purchased it before and are confused about how to buy the best one, just get the adhesive that is suitable for this DIY project. The main categories of tile adhesive depend on the area to which it will be applied.
Also, I always check the reviews online after shortlisting several brands.
Sealant
Sealants are a shield of protection for tiles and any other material they are applied to. This component serves as a barrier against dirt, dust, chemicals, moisture, and any external factor that can cause harm to tiles. Needless to say, the sealant is a must-have.
There are two common types of sealants – polyurethane and silicone. The latter is the least demanding and long-lasting.
Speaking of the factors you should keep in mind when choosing a sealant, consider the service life, movement tolerance, paintability, efficacy, substrate compatibility, and cost of the sealants available in the market.
Tile spacers
With tile spacers, it’s possible to achieve a consistent arrangement of tiles and determine that there’s no mistake in their pattern.
Without tile spacers, you will have a hard time applying grout as your tiles will be in a complete disarray. Moreover, a skilled application of a spacer will let you understand how much grout you need.
Though tile spacers are optional, I advise you to follow this step. Without them, the tiles automatically become vulnerable to popping and breaking. And I don’t want this exciting project to turn out to be a waste of time for you.
MDF
MDF stands for medium-density fibreboard, and it’s an altered wood material formed by breaking down different wood types. It is widely utilized in furniture, is affordable and eco-friendly.
Due to the unbeatable strength and density of this material, tons of desks and tables are made of it globally. It adds an additional layer of protection for vulnerable materials such as glass, marble, and more.
If your tabletop is made of a fragile material, it’s a great idea to add MDF to it. This will erase all worries regarding the longevity of the tabletop.
A Step-by-Step Guide to Tiling Your Outdoor Table
Now, with simple tools and chosen tiles, we’re going to transform a dated table. So, go to a safe workspace and make sure all equipment is ready.
Before you start, it’s essential to clean the table with wipes and ensure that it can hold the tile’s weight. In case you want a plywood or MDF coating, cut it to match the tabletop, the same as you have to do with tiles.
Step #1: Apply tile adhesive
If you have bought a ready-made tile adhesive solution, you’re good to go. If not, read the manufacturer’s guide to make the adhesive paste. Ensure that the consistency is smooth and resembles toothpaste. If it isn’t, make adjustments accordingly.
Take a notched spreader to apply the tile adhesive in 5 mm-width sections. Start at one corner of the table and work your way down. Don’t use too much of the product.
Step #2: Organize tiles and spacers
Place a tile against the table’s edge and add a spacer in between. Repeat until the tabletop is covered, with even gaps between tiles. Next, press the tiles in the tile adhesive with a wet cloth, remove the excess spacer, and allow it to dry.
Step #3: Use grout to fill in the gaps
Use these simple steps and you will quickly and easily apply grout and get the desired final result:
- Run a nozzle of ready-made grout between the tile’s edges.
- If your grout isn’t ready-made, follow the manufacturer’s recommended ratio of water and grout.
- Tilt the bucket and stir the mixture with a specialized knife.
- Adjust the consistency by adding more of either ingredient.
- Leave it for 10 minutes.
- Use the knife to mix it again.
- Take a wet sponge to balance the grout into the gaps. Keep removing the excess grout.
- Leave it for half an hour.
- Get a wet sponge to clean the grout haze that forms afterward.
It’s possible that you will have to clean the grout off several times, as it’s pretty sticky and can be hard to remove.
Step #4: Apply sealant
If you notice gaps between the table’s frame and tiles, I recommend using a high-quality sealant.
- Apply a generous amount of sealant with a foam brush. This brush prevents bristle marks, and the narrow tip penetrates into the grout lines.
- Allow it to rest for the duration as instructed by the manufacturer.
- Apply a second coat after the previous one is completely dry.
Who says tasks like this are just for men? As you can see, the steps to transforming your desk are simple, so trust your dexterous hands.
Step #5: Finish
We’re almost done. You just need to affix the tabletop to the frame by using the holes already present beneath the plywood backing.
In case you didn’t use plywood, cut four tiny blocks of wood and drill holes through them. Voilà! Lightly clean the surface and see if there are any unfilled holes.
How to Protect an Outdoor Tile Table?
First and foremost, learn the language of your tiles. Not all of them can be treated and cleaned equally. For instance, natural stones require gentle treatment. Likewise, keep harsh cleaning tools away from ceramic tabletops as they are prone to scratches.
Whenever the tabletop appears dirty, clean it softly with a detergent solution and sponge. By using an oxygen bleach solution, disinfect and degrease the surface.
After every few years, sand your tile tabletop and apply sealant. This action shields the table’s surface from oil, acidic solution, and oil. Polishing or sanding will reveal a new skin of the tile.
Over to You
There you go. You have learned how to successfully upgrade an old but still useful table to a gorgeous tiled patio piece with easy steps.
Allow the final result to bask in the limelight. Treat it with love, and the DIY patio table will last for years.
If you are interested in more creative topics and fashion ideas, check out my blog and enjoy reading.
Similar in blog

Tips and Recommendations for Removing Hair Dye off the Counter
Is it possible to get hair dye off the counter? Well, it’s definitely a challenge. The main problem with hair dye is that even if you…

A Guide to Choosing Proper Curtain Length for Your Windows
Should it touch the floor or not? This is the hardest decision to make when it comes to choosing the best curtain length. Drapes can entirely…

3 Easy Ways to Hang Shelves Without Nails
How do you normally attach shelves to the wall? I guess you would take some nails, hammer them into the drywall, and hang the shelf. Using…

Design Your Porch Ceiling with These 10 Nifty Ideas
Redesigning your porch ceiling is probably not high on the list of renovation tasks you have for the nearest future. However, what if I told you…

How to Decorate Your Home Deck with Plants – 9 Best Ideas
How would you describe your ideal home deck? Is it minimalistic? Peaceful? Or cheerful? If you love spending time on your patio, it's a great idea…

A Guide to Choosing the Best Coffee Table for Your Home Interior
The world of interior design greatly revolves around tables - end tables, console tables, side tables, dinner tables, and of course - coffee tables. So, considering…

26 Ideas to Decorate Your Loft Apartment
Loft apartments are hotcakes in the real estate world. Many celebs, including Vanessa Carlton, reside in lofts. I'm a huge fan of this property type myself,…
14 Home Decor Ideas that Use Subway Tile with Black Grout
Do you think subway tiles are boring and you can't do much with them? Well, I wouldn’t be that adamant. Although these tiles might look basic,…