A Full Guide to a Stress-Free Kayaking Session for First-Timers
What is your favorite way to spend time on the water? For me, it is kayaking. I love the feeling of gliding through the still waters in the early morning or afternoon.
But I have to be honest; it took serious strength and a learning curve to let go of my fears and tap into this activity. Back then, I wished to have someone support me as a beginner.
If you’re in the same place as I was right before trying this activity, I’ve written this guide to prepare you for a safe and unforgettable kayaking experience. Apart from answering the most burning questions in your mind, I’ll also share tricks for beginners and much more!
Ready to be known as a kayaking pro? Great! Let’s dive in.
Table of Content
How Hard Is Kayaking for Beginners?
You know I don’t sugarcoat anything, so I’ll be realistic here. Kayaking is hard if you’re not given the proper resources and techniques.
Another thing to remember is that many kayaking types exist, meaning paddlers can decide about speed, direction, and distance.
For me, the most challenging aspect at the beginning was getting in and outside the boat. That’s why I suggest practicing it on land first.
Practice makes perfect, so remember to give time to this exciting activity.
If you need some motivation, remember my story about when I first tried rock climbing. While everyone was halfway to the top, I couldn’t even start – I had no strength and was so scared! And now? Now I am the fastest climber in the group!
Do you need to be athletic to do kayaking?
No, kayaking does not demand much athleticism. However, keep in mind that twisting your bottom or core and body rotation can be tiring at first.
Also, this watersport is directed at the core muscles the most. The initial sessions will lead to muscle cramps, but with time, it will be better.
The best way to move forward would be to learn the paddling techniques from a coach or instructor. However, I have some tips in store for you, too.
A Guide to Preparing for Your First-Time Kayaking Session
Aside from simply being fun, kayaking is a great activity to try out, especially if you want to get into sports gradually and not overwork yourself.
Here are some benefits that kayaking brought me in the long run:
- Boosts flexibility, strength, and aerobic fitness.
- Improves cardiovascular fitness.
- Strengthens core muscles and upper body.
Now, let’s learn helpful tips to build up your kayaking skills.
Step #1: Learn about the types of kayaks
Before you do kayaking, you’ll have to choose the right kayak type for your first activity.
But which one is the best? There are so many of them, from whitewater to inflatable, etc.
In my opinion, first-timers should go with the recreational type as it’s the most basic, easily navigable, stable, suitable for different waters, and comfy.
Next, you’ll have to pick the style of a kayak. The most common are sit-on-top or sit-in kayaks.
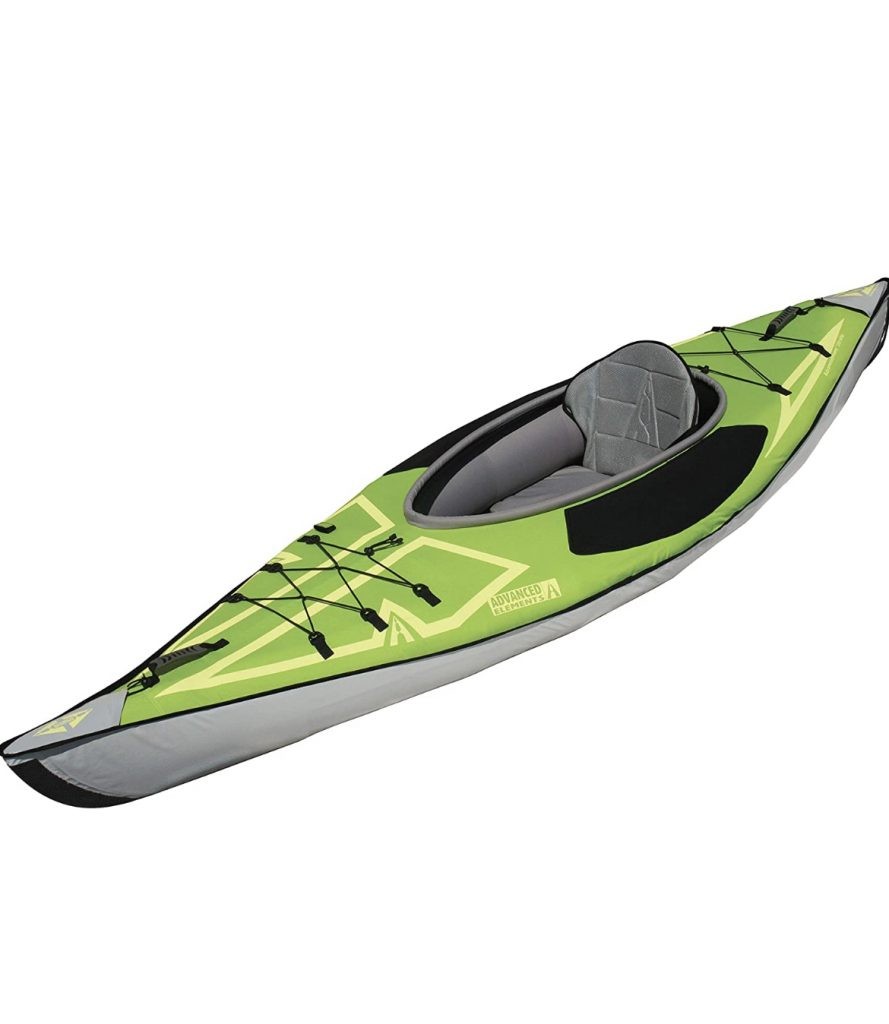
Let’s first discuss sit-in kayaks. Paddlers can insert their legs into the hull of the sit-in kayaks because they come with a cockpit. This hull can feel confining to beginners, but they’re the comfiest and most practical for long distances. Another con is that getting in and out of these might be stressful, at least for me.
Here’s how it looks:

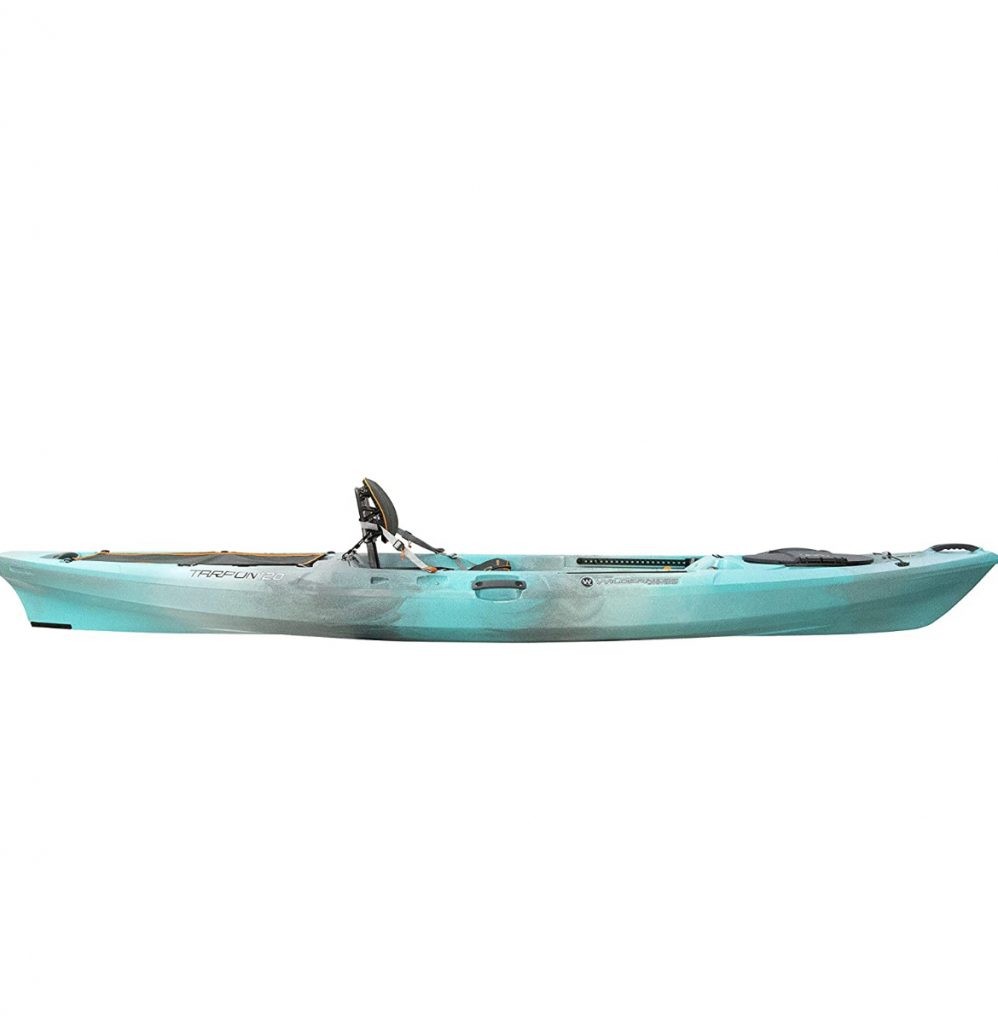
On the other hand, sit-on-top kayaks are the best for first-timers as they’re easy and comfortable to get in and out.
And here’s a good one that I used to have:

Trust me, with this “rocket,” you can paddle effortlessly.
Step #2: Bring the right clothes and equipment
First sessions can be difficult if you don’t bring proper clothing and equipment. Essentially, everything you wear should be quick-drying and lightweight.
Moreover, the clothes should enable complete mobility and shield from the sun. But you don’t have to go on a shopping spree! I bet you have appropriate clothes in your wardrobe.
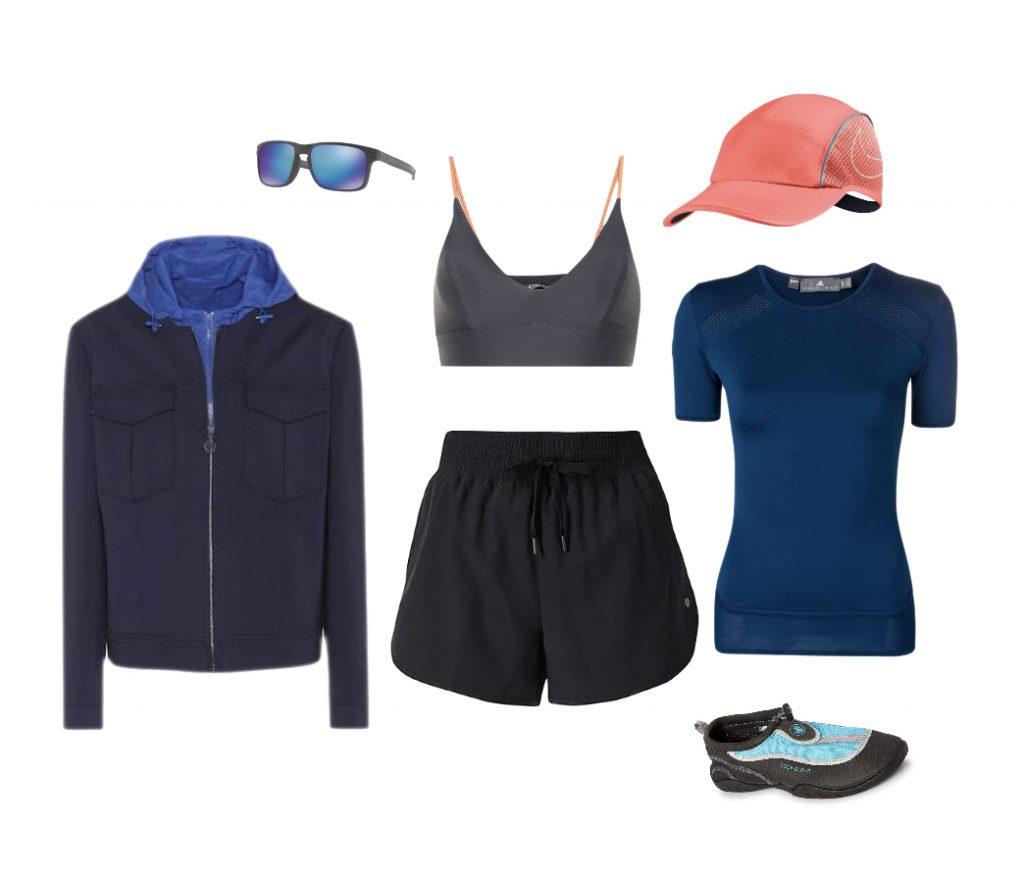
Here are must-have clothing items for beginners:
- Supportive sports bra or swimsuit.
- Quick-drying shorts.
- Water shoes or sandals.
- Polarized sunglasses without a retainer.
- A sun hat.
- A lightweight rain jacket if it’s breezy.
And here’s a great outfit with everything you need:

Forget fancy outfits during this activity. Leave skirts and cute polo shirts for dinners, country clubs, and similar places.
As for the equipment, here are three things to buy:
- A long-lasting paddle.
- A life vest.
- A bilge pump if you have to throw water out of the kayak.
That’s it!
Step #3: Enter the kayak the right way
As I mentioned earlier, if there’s one thing that scares first-timers when they start kayaking, it’s getting inside the kayak without tipping it or getting water on yourself.
However, the entering technique can differ based on where you’re launching from. For instance, paddlers can enter the kayak from boat ramps, docks, beaches, or shore.
Based on my experience and everything I learned from my instructor, I’ve listed down four options to enter a kayak from different locations:
- From a sloping part of the shore: position the paddle perpendicular to the kayak, behind the cockpit or seat. Approach the cockpit from the side and insert your feet first.
- From a boat ramp: walk knee-deep in the water prior to getting in the kayak. Put the paddle perpendicular across the kayak while getting in.
- From a dock: tie a rope to the midpoint of the kayak. Put the paddle in the dock within access. Go inside the cockpit by inserting your legs and seating yourself. Do this in one swift motion.
- From the sloping entrance of the beach: grab the bow on the kayak and direct it to the water while walking down the slope. When the last wave rolls down, jump in the seat.
Finally, let me warn you against a common mistake beginners make at this stage. If you don’t want the process to be physically hard, don’t stand in the cockpit right after entering. This will topple you over (been there, done that).
Step #4: Assume the right position
Another thing first-time kayakers struggle with is keeping a correct position. It can be hard to kayak if you sit uncomfortably. So, allow me to give you suitable recommendations for legs and body posture.
Sit with your legs out and an erect back without being tense. Your knees should be somewhat bent against the kayak sides – this contact guarantees power and stability during strokes.
Now let’s come to the feet. If you have a sit-in model, take advantage of the foot pegs at the front of the kayak. By using the foot pegs and slightly bending your legs, the knees will automatically move forward and have contact with the sides of the kayak. Can’t achieve this posture? Simply adjust the foot pegs!
I’ve shared a YouTube tutorial below to give you a better understanding of what I am talking about:
As we can see, this video perfectly explains everything about mobility and posture in all stages of kayaking. Finally, at the end of the tutorial, you can see the advanced example.
Step #5: Practice different paddling techniques
Let me now share the simplest paddling techniques that will make it easy to kayak. You’ll quickly learn how to paddle forward and backward.
- Forward stroke: use the paddles to move the kayak forward.
- Sweep stroke: tilt your core slightly to shift the kayak in a different direction.
- Draw stroke: shift the kayak sideways.
- Reverse stroke: either move backward or stop the forward movement of the kayak.
Here’s a visual demonstration of these paddling techniques:
Brad, the instructor from REI Outdoor School, shows different types of strokes, and I think this is the best tutorial for all beginners. It helped me a lot when I went kayaking for the first time.
Step #6: Stop and turn the kayak properly
Another aspect that can make kayaking hard is stopping and turning the vessel properly.
Essentially, here’s what you should do:
- Stopping: place the paddle in the water and pause it there. Drag it against the water. This action will reduce and ultimately halt any movement of your kayak.
- Turning: want to turn right? Paddle on your left and vice versa.
Finally, here’s another video I picked for you to understand the motion:
Mike Aronoff is such an expert in kayaking, and his way of teaching is amazing! There’s not much to say. If you want to turn your kayak quickly, just follow the steps from his video, and you’ll soon become the kayaking master!
Step #7: Safely exit the kayak
Okay, we have discussed in detail how to get inside the kayak. Now, it’s time to learn how to exit it safely. Without learning this skill, you will definitely find kayaking hard.
The steps to exit a kayak are simple – just reverse the entering steps. For instance, while exiting on the shore, paddle the kayak closer to the land or into shallow water. And, while exiting on a dock, tilt your body to face the dock and slowly pull yourself out. Remember these tips for safely landing your kayak in whatever situation.
5 Crucial Safety Tips to Follow While Kayaking
Let me be honest with you – kayaking is hard, but only when you create obstacles yourself.
What does it mean?
Many first-timers enter this activity thinking they know everything and completely disregard crucial safety rules that are a must to follow.
If you don’t want to be reckless while kayaking, follow these tips to protect yourself from unnecessary and avoidable injuries.
- Always wear a safety jacket and a helmet.
Yes, I’ve mentioned wearing a safety vest before, but a helmet won’t cause any harm, either. Even if kayaking is known as a safe sport, many accidents primarily happen due to being careless with safety gear.
Remember that this also applies to expert kayakers.
- Do not paddle alone.
While we often see professionals enjoying this watersport alone, I don’t recommend the same to first-timers. Try pairing up with your friend or partner to gain better confidence and stability. Also, if something happens, you’ll have someone to help you.
Finally, you will create happy memories this way too!
- Go kayaking in waters you know and can navigate.
I can’t stress this enough for beginners. No matter how much the choppier waves intrigue you, only do kayaking in familiar and stable waters. A calm lake on an afternoon is the best way to have your first experience.
- Avoid kayaking in bad weather.
You will never see any kayakers out in the rain and strong winds. Why? Because the bad weather will involuntarily shift your kayak, make it harder to paddle, and even cause an accident. So, better be patient and only go out when it’s sunny.
- Do not drink alcohol before kayaking.
Same as driving on the roads, you need complete focus and sanity on the waters.
While we’re on the topic of safety tips, let’s discuss the best and worst weather conditions for kayaking because weather impacts the paddler’s safety as well.
As a kayaker, you’re better off doing something else if the weather is windy or rainy. So, always keep an eye out for the weather forecast.
Want to be extra safe? Try kayaking in the most favorable season of the year – spring. I myself started kayaking in the early spring, and I loved my first experience because of the crisp weather!
Also, you can predict rain if you are familiar with cloud types. The bad weather is caused by lower Cirrus clouds. Moreover, the temperature drop and low air pressure are also related to rain. P.S. My grandpa taught me all these interesting things!
Most Common Kayaking Fears Among First-Timers
I hope I have assured you that kayaking is not hard. But if you have other fears about this watersport, this section will sort all your doubts out.
Here I have the questions that I myself needed answers to the first time I tried kayaking.
What if I fall off the kayak?
I had the same fear, but I learned pretty quickly that it takes a lot for your kayak to flip.
But even if it happens, it’s not difficult to get back. This is why safety gear is extremely important. As long as it’s on, you won’t drown. Try falling off voluntarily so that you can practice entering the kayak.
What if sharks attack me while kayaking in the ocean?
Do you have a shark phobia? We’re all naturally afraid of these creatures, but they’re rarely in lakes or common kayaking water bodies. If you’re with a coach or a tour operator, ask them whether sharks live in the area. Alternatively, you can ask the locals if you’re on your own.
What if weather conditions change suddenly?
In case it suddenly rains, tilt your kayak towards the shore, dock, boat ramp, or beach. Push through the shallow water and get out of the kayak when the water is knee-deep. Carry your kayak and equipment to the land.
How to paddle if it’s too windy?
Yes, I advised you not to kayak in such weather. But no one can completely predict the weather, and it can suddenly change while you’re on the water. So what should you do in that instance?
Simply wait for the wind to pass and firmly pause kayaking by putting the paddle in the water.
Best Places for Kayaking around the United States
Are you excited to ride the kayak now? It’s important to know the safest, most stunning, and most fun places in the country for enjoying this watersport. For this purpose, here are my recommendations:
- Mountain Lake in Colorado
- Spring-Fed River in Florida
- Desert Lake in Arizona
- Iconic Pacific Coastline in California
- Urban River in Washington
- Harbor Islands in Massachusetts
- Remote Glacial Lakes in Minnesota
- Pacific Northwest Islands in Washington
This list includes both lakes and rivers. Pick out a lake first and, after gaining experience, choose any river you want.
Over to You
Woohoo! You’re all set to be a kayaker now. Before you hit the water, here are the tips I discussed about kayaking:
- Choose a recreational and sit-on-top kayak.
- Wear quick-drying and lightweight clothing.
- In equipment, invest in a bilge pump, a life vest, and a durable paddle.
- Sit straight with slightly bent knees.
- Learn the forward, sweep, reverse, and draw strokes.
- Bring a kayaking partner with you.
- Choose familiar and stable waters.
- Don’t go out in bad weather.
- Don’t drink alcohol before kayaking.
Impressed by this article, guys? If yes, check out other guides on my blog!


